Origami Corner Bookmark Printable Instructions
Origami Corner Bookmark Printable Instructions - We’re using a matching highlighter to draw the wing patterns. Fold a piece of square origami paper in half, diagonally. You can use a square piece of paper or one of our themed templates. Both colored areas should show on the top of the triangle. Trim along lines to cut out the square. Take the top layer of paper, at the top of the triangle, and fold the top to the bottom. Repeat with the other side to form a square. 3 take the corner on the right side and bring it up to the top corner. Web how to fold a basic origami bookmark. With the graphics underneath, fold the corners up and over to the corner. Take the top layer of paper, at the top of the triangle, and fold the top to the bottom. Choose your favorite template below, then print and cut it out. The origami bookmarks below were created using a 5 inch square. You will get a shape of a triangle. Fold in half so that the graphics are on the outside of the page. The strips are the antennas of the origami butterfly. Fold each point of the triangle up to meet the tip. Please note that these are for personal use only. You can use a square piece of paper or one of our themed templates. Depending on the finished size you desire somewhere between four and six inches is a good starting point. Web how to fold a basic origami bookmark. Trim along lines to cut out the square. Fold the right corner of the triangle over to meet the bottom corner. Prepare to craft first, gather up your supplies and cut your paper into 6″x6″ squares. The paper should be in a triangle. All you need is a piece of paper to make the corner bookmark. Fold the corner of just the top sheet of paper. The graphic should now match. Trim along lines to cut out the square. Start by placing the paper with the corner facing you and the. You can also email me if you have any issues. Invite your child to fold the diamond in half, taking the bottom corner to the top to form a triangle. Repeat with the other side to form a square. You can use a variety of paper for this, whether it's plain or colorful, matte or shiny. Fold the right corner. You should now have a smaller diamond with a line down the middle open up the last two folds folds down the. Fold it in half diagonally to make a triangle. Plus, it's inexpensive and doesn't take much time to create. Unfold steps 3 and 4 leaving a triangle. Choose your favorite template below, then print and cut it out. Make a middle small triangular flap, by taking the corner and folding up (top left image). Prepare to craft first, gather up your supplies and cut your paper into 6″x6″ squares. Crease well and then unfold. Unfold steps 3 and 4 leaving a triangle. Crease the paper at the bottom of the triangle. Crease the paper at the bottom of the triangle. Fold a piece of square origami paper in half, diagonally. We also attached 2 small strips on the top side of the origami pattern, between the wings; Repeate for the other side (top right image). The graphic should now match. Plus, it's inexpensive and doesn't take much time to create. Trim along lines to cut out the square. My 4 and 6 years olds can make it by themselves after practicing a few times. Depending on the finished size you desire somewhere between four and six inches is a good starting point. Web or, see below for the instructions. To begin making your origami bookmark, place your origami paper on a flat surface with the white side (or side with no pattern) facing up. These will be sent as a zip file with all three designs included. The origami bookmarks below were created using a 5 inch square. Lay a square of paper on the table top in a diamond position. You can use origami paper, printer paper, or. You can also email me if you have any issues.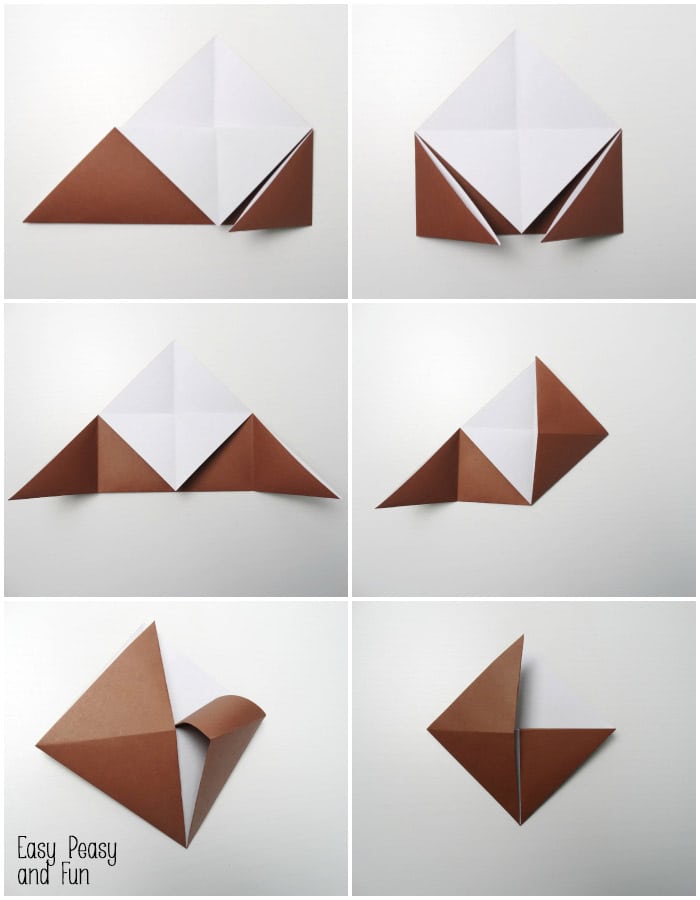
Reindeer Origami Corner Bookmark Easy Peasy and Fun
:max_bytes(150000):strip_icc()/step3-56a6e8795f9b58b7d0e56ed5.jpg)
How to Make an Origami Corner Bookmark

Origami Corner Bookmark Instructions Origami
Best Origami Corner Bookmark Printable Instructions Kaylee Blog

Origami Corner Bookmark Instructions Origami bookmark, Bookmark
Unfold The Bookmark To Look Like The Previous Step.
With The Graphics Underneath, Fold The Corners Up And Over To The Corner.
Web Matches The Top Corner.
Then, Fold The Paper In Half Diagonally In The Opposite Direction.
Related Post: